Hello All, We are going to see about Appium Installation for Android. What is Appium? Appium is an open source testing automation tool for mobile applications. It allows you to test the following three types of mobile applications native, hybrid, and web applications.


It allows running our automation test case on actual devices, emulators, and simulators on both IOS and Android. Appium installation differs between Android and iOS. Appium installation for Android: Note: Appium would not support below API level 17 mobiles.
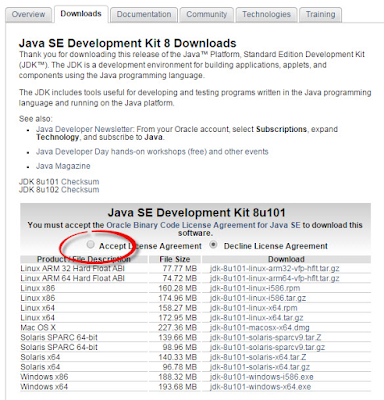
Step 1: Download JDK and install
- Go to http://www.oracle.com/technetwork/java/javase/downloads/index.html page and download JDK.

- Click "Accept License Agreement" radio button and click on .exe link to download JDK based on your OS as shown in the below image. Select "Windows x86" for 32 bit system and "Windows x64" for 64 bit system.

Use following step install JDK in your system.


It will take some time to install JDK and at the final stage of installation
Step 2: Create environment variable “JAVA_HOME” and set variable value as JDK installed path.
- Right click on My Computer icon which is located on your desktop or Win Start.
- Select Properties
- Click on “Advanced system settings” and choose “Advanced” tab and then click on “Environment Variables…”

- Under System variables click on New button

Assign variable name as “JAVA_HOME” and Variable value as java-installed path like below.

Step 3: Add jdk installed path with “/bin” in the “Path” environment variable value. Click “path” environment variable and add jdk path with “/bin”

Step 4: Download Adt bundle instead of the Adt bundle zip which has the following folders namely sdk, eclipse, and Sdk Manager

Click on Sdk Manager.exe and following window will be open

Download all the packages
Step 5 : Create environment variable “ANDROID_HOME” and set variable value as SDK path.
- Right click on My Computer icon which is located on your desktop or Win Start.
- Select Properties
- Click “Advanced system settings” and choose “Advanced” tab and then click on “Environment Variables…”

Under System variables click New button

Assign variable name as “ANDROID_HOME” and Variable value as java-installed path like below.

Step 6 : Add “ANDROID_HOME” name with symbol “%” before and after with “/tools” in the “Path” environment variable value.

Step 7: Add “ANDROID_HOME” name with symbol “%” before and after; with “/platform-tools” in the “Path” environment variable value.

Step 8: Open command prompt and type “Android” and SDK Manager will come up, which means android environment variable is successfully created.
Step 9: Enable USB debugging option in device
- Go to Settings and Click on Developer options then follow the below steps.


Step 10: Download and install Microsoft .net framework Download:
- Search for "download latest version of Microsoft .Net Framework" keyword In Google.
- It will show you the latest version download link as below.

It will take you to the Microsoft .Net Framework latest version download page.
- Current version is Microsoft .NET Framework 4.5.
- Click on download button. It will download the .exe file to install Microsoft .Net Framework (e.g. dotNetFx45_Full_setup.exe).

Step 11: Download and install Node Js Download:
- Go to the following URL https://nodejs.org/en/download/

It will download Node JS installation .msi file (e.g. node-v0.12.7-x86.msi).
Install:

- Double click on Node JS installation .msi file.
- It will open Node JS installation dialog.
- Proceed for installation with default selected options and settings on each screen of installation dialog box.

- Go to PDANet+ http://pdanet.co/
- Click on Download button. It will take you to PDANet+ for Android download link page.

- Click on download link as shown in above image. It will download installation file (e.g. : PdaNetA4181.exe).
- Connect your android phone with PC with USB debugging mode enabled.
- Double click on PDANet+ installation .exe file.
- It will open PDANet+ installation dialog.
- Proceed for installation with default selected options and settings on each screen of installation dialog.
- Go to link http://appium.io/
- Click on Download Appium button.

It will download zip file.
- When download completes, Extract zip file.You will get AppiumForWindows folder as shown bellow.
- Open AppiumForWindows folder. "appium-installer.exe" file will be there.
- Double click on "appium-installer.exe" file to install appium. It will start installing appium.
- It will ask you to select setup language.
- Select English and click on OK.

It will launch Appium Setup Wizard. Click on Next button.

- Next screen will ask you to select appium destination location. Leave it as it is and click on Next.

- Next screen will ask you to set name of appium. Leave it as it is and click on Next

Click on Next on Select Additional Tasks screen.

- On Ready To Install screen, Click on Install button. It will start installation.

- At the end of installation, it will show Completing the Appium Setup Wizard. Select Launch Appium check box and click on Finish button.

- It will launch Appium as shown below.

Appium is installed and ready to use.
Configure Appium Appium will launch with default configuration parameters. To reduce errors during software automation test execution, You need to set/modify few appium parameters as per your requirement if they are wrong or not set properly. See bellow.Android Settings :
- Click on Android Settings button as shown in below image.
- Select Platform Name = Android
- Select Automation Name = Appium
- Select Platform Version = Your android device's OS version. For me it is 4.2 Jelly Bean.

General Settings
- Click on General Settings button as shown in the below image.
- Note down Server Address and Post number. We need it during appium software automation test script creation. Server Address is: 127.0.0.1 and Port number is : 4723.
- Un-check Pre-Launch Application check box if it is checked.

Leave all the other settings as it is.
Comments
Post a Comment